Because controlling as much of the 3D printing process as possible is directly related to end-product quality, measurement is critical. But what should you be measuring—and how, and in what ways, can this metrology be exploited to ensure that the end result is a perfect, in-spec part?
There are a host of metrics considered key for successful metal additive manufacturing production, but three areas stand out as the most critical: meltpool status, atmospheric composition, and powder-bed height.
Meltpool monitoring
Much can happen to affect the quality of the base material as it is transformed from powder to solid metal in the build chamber. Too much laser energy can cause it to vaporize, while too little results in unmelted powder. Both scenarios can result in problems in porosity that can have a negative impact on the mechanical integrity of a printed part.
Meltpool monitoring of the active micro-welding area where the laser meets the powder can gather data related to the laser beam, the temperature of the liquid metal, even the meltpool surface tension. When anomalies outside control limits are detected, the machine can alert the operator to interrupt a build and change settings, or even stop the build completely. Some systems rely on a photodiode for these measurements, while others incorporate mirrors and a high-resolution camera for optimal performance.
Next-generation AM systems go beyond just reporting such data, instead providing integrated, in situ process metrology to detect individual meltpool instabilities all the way to enabling closed-loop energy adjustments in real time during the build. Post-production, correlating in-system metrology data with part outcomes can help identify probabilities of porosity for any given region in a part.
Atmosphere analysis
When manufacturers print metal parts at very high temperatures in a less-than-perfect build-chamber environment, any unwanted atoms or molecules in the atmosphere can become incorporated into the material as it solidifies. The presence of oxygen in the chamber can lead to oxidation, causing pores to occur in the build material. Hydrogen can react with and embrittle the metal. Humidity of any kind must also be monitored, because metal powder acts like a desiccant and will absorb water vapor. If the powder bed absorbs moisture, the water will be ionized when the laser hits it, leading to other complications in addition to oxidation.
Another problem with the presence of humidity involves printing at very low angles, where the process window is much smaller than the middle of a part where printing is technically easier. In these low-angle areas, too much oxygen or humidity can cause a great deal of instability and can affect the mechanical properties of the part.
It is essential, therefore, that manufacturers maintain an extremely pure and controlled atmosphere during the 3D printing process. To accomplish this, metal AM systems typically replace the build chamber atmosphere with argon, a noble gas that is non-reactive, thus providing an inert atmosphere for the build. Metrology data about humidity and oxygen levels are monitored constantly in next-gen systems and compared against control limits—so the data becomes meaningful and actionable.
Ensuring proper powder bed height
Throughout a metal AM build, it is essential that the powder bed be maintained at the correct height, and that there are no ridges, waves, or other variations in it. Protuberances of solid metal through the powder bed represent the most frequent and challenging problem that manufacturers face: the commonly used recoater arms that spread the next layer of powder in most current systems will hit anything that sticks up too high. Many of these more traditional systems rely on photographs of the powder bed to make qualitative analyses of the build process. Next-generation AM systems, on the other hand, offer both a non-contact recoater arm and integrated metrology, so that the topology of the powder bed is constantly, quantitatively measured and monitored for inconsistencies.
In such systems, mapping the layer height not only detects variations in the powder bed, it can instruct the re-coater to lay down the next layer of powder in a way that corrects a problem that has been detected. The process can be repeated—in closed loop fashion—until the system indicates that the situation has been corrected.
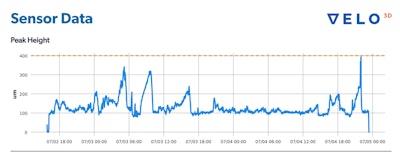 Detecting variations in layer height. Quality assurance capabilities in next-gen AM systems track whether a build is showing any signs of unwanted protrusions; crossing the warning threshold will alert the user.Velo3D
Layer-height data can also be used to analyze the build behavior of an individual part. Details of a build can be color-coded in the scan for each layer according to how far powder bed height deviates from the specified nominal value. Blue images may indicate a minor deviation that may have minimal effect, whereas red images report areas of greater concern. Such visualization can be used to track trends in the build process to see if there are design weaknesses that need to be modified.
Data science and material science converge
Even with AM systems that have relatively simple metrology suites, it is sometimes possible to see when things go wrong, as sensors will indicate when a measurement is off-nominal. But operators usually do not have all the information they need to allow them to go back and determine what the cause of an inconsistency is at the time it happens. In order to accomplish this, a field engineer is often called to download system logs so they can be sent out and analyzed—a highly inefficient and time-consuming process.
To ensure print accuracy, many of today’s available AM systems require a custom instruction file for every serial number of machine, even if printing the same part in the same material—a herculean task, particularly when it comes to qualifying a part. With the advanced metrology and quality-assurance software that now comes with next-generation systems, every machine will produce the same results with the same material, no matter where in the world it is located. Operators are provided with complete visibility into real-time machine performance. Should an issue arise, users can query system logs to determine root cause, gaining valuable insights from data that are simply not available with most current systems.
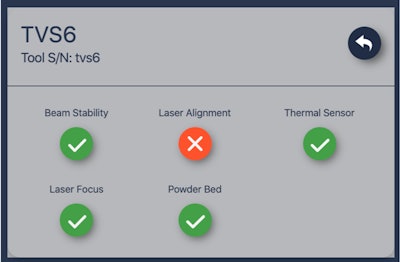 Machine health in a Velo3D Sapphire system can be checked via a single click on a dashboard to ensure that powder bed quality, sensors, and optics are calibrated and in optimal condition, and will not compromise part quality.Velo3D
Because these new machines make thousands of measurements of each layer of a build, the resulting database consists of literally millions of data points. Manufacturers can collect and save this vast amount of data, analyze it, and use the confluence of material science and data science to ensure that every part is being built within specification all the way to the end of the build. Quality control that’s performed in this way, while the component is being physically manufactured, is inseparable from the production process itself, ensuring that the outcome is reproducible and repeatable across enterprises of any size.
Zach Murphree is vice president of technical partnerships at Velo3D.

